
[Dieser Beitrag enthält Werbung] Willkommen zum August Block des 6 Köpfe 12 Blöcke – Quilt Alongs, dem wundervollen Wild Goose Chase Quilt Block! Aller guten Dinge sind drei – richtig?! Nach diesem Block wird niemand mehr eure Foundation Paper Piecing Fähigkeiten in Frage stellen. Ich muss ganz ehrlich gestehen, dass ich Foundation Paper Piecing nur mag, wenn ich nicht zuviel um die Ecke denken muss und die Gefahr des Auftrennens fast ausgeschlossen ist – dann macht es mir richtig Spaß! Bei diesem schönen Block nähen wir praktisch nur mit Dreiecken, die sich ohne Probleme auf der Papierschablone platzieren lassen. Ich bin gespannt wie er dir gefällt…
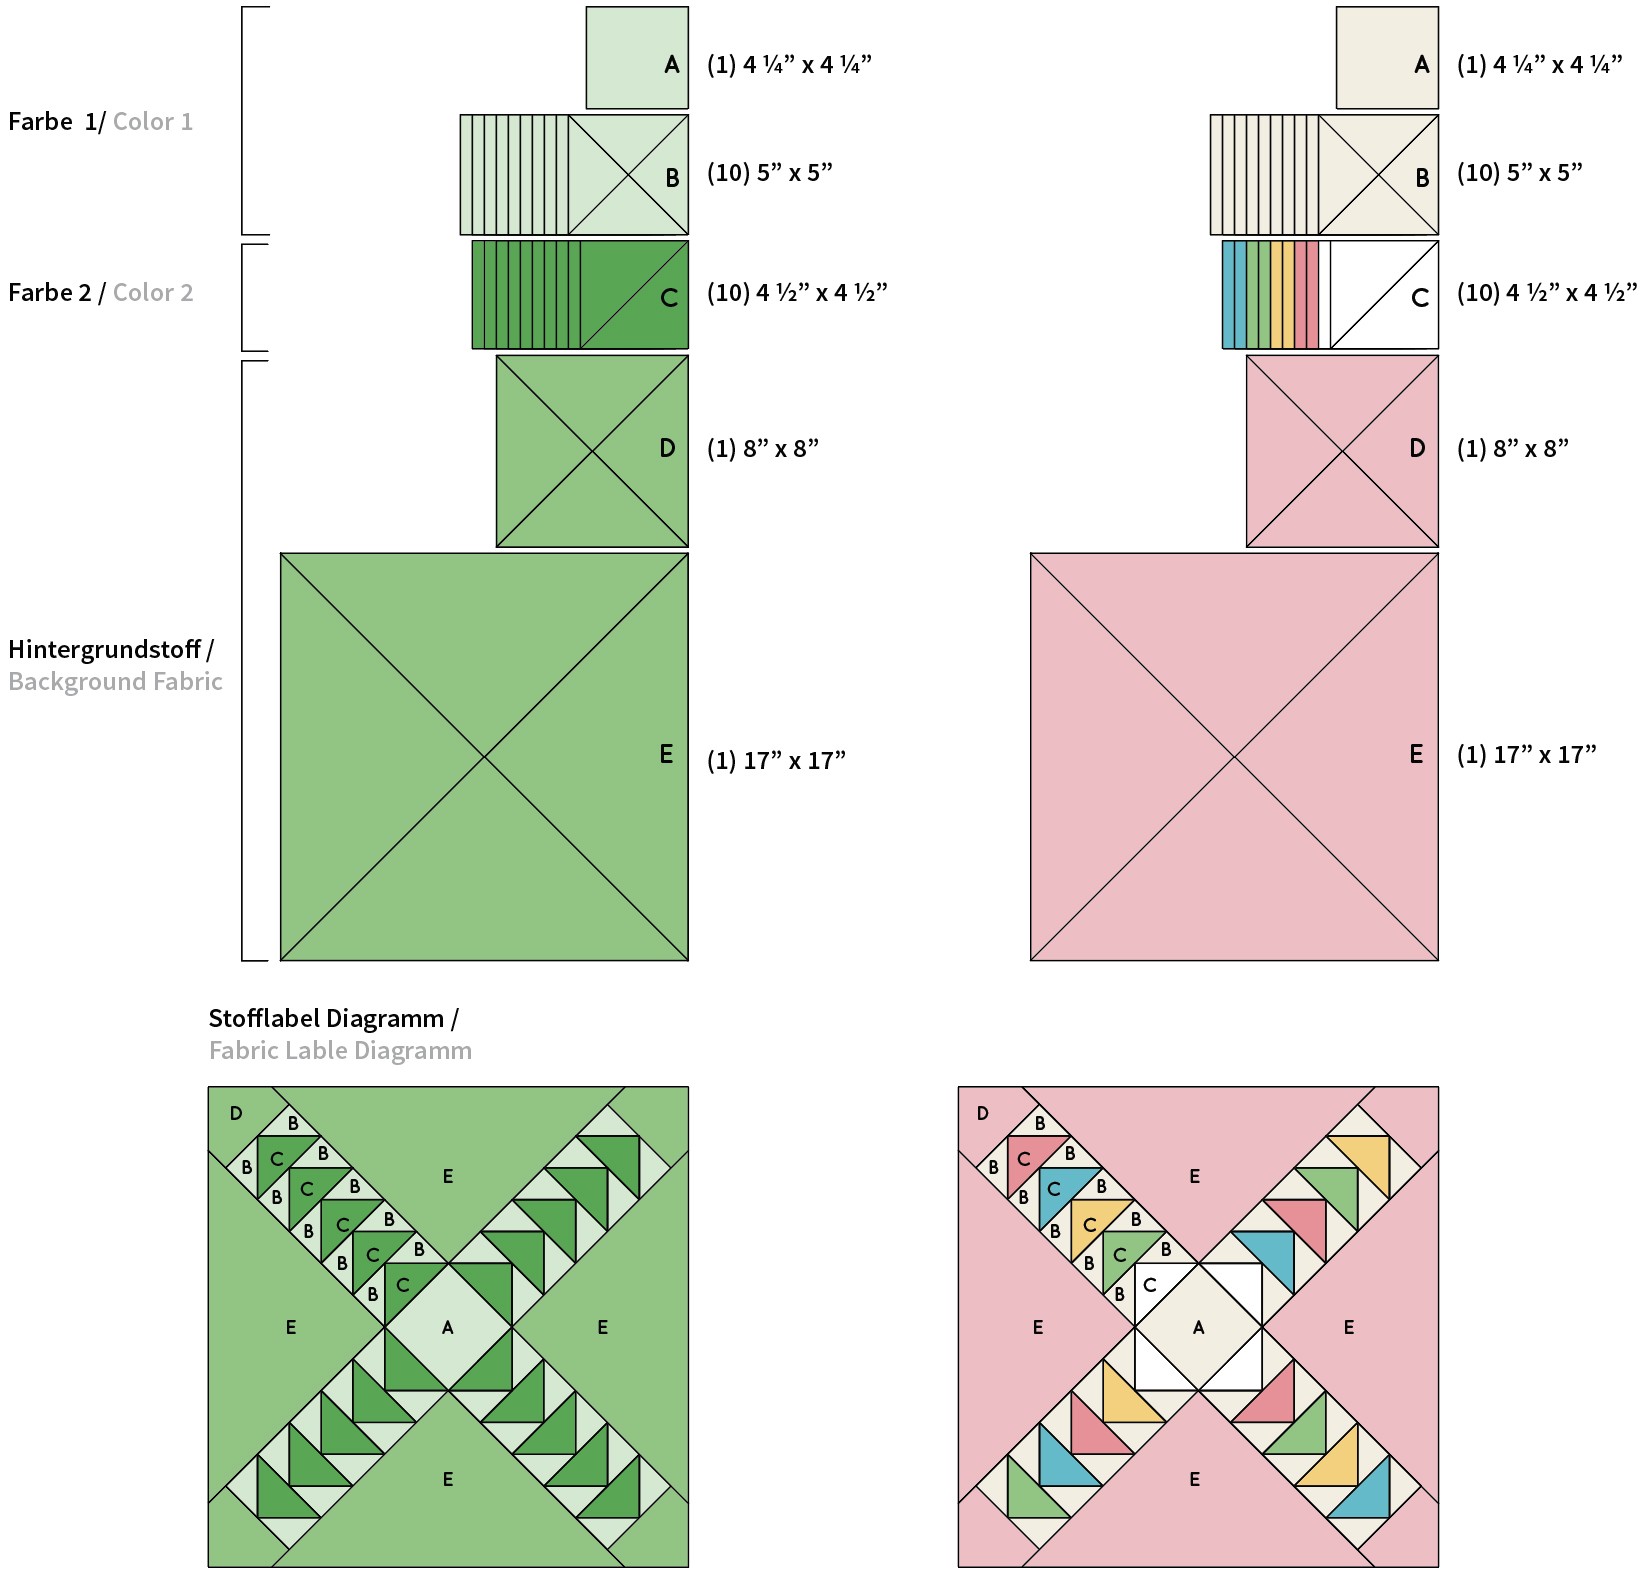
Klein gemusterte Pastelltöne und Low Volumes (Drucke mit cremefarbenen Hintergrund) aus allen meinen Stoffkollektionen, sowie ein pinkfarbener Hintergrundstoff (Kona Cotton Medium Pink) und mein cremefarbenen Standardstoff bilden das Farbgerüst meines Quilts – eine absolute Traumkombination! Ich stehe total auf die bonbonfarbenen Quilts aus den 30er Jahren und tobe mich mit dieser Stoffkombination so richtig schön aus. Dieser Quilt wird ein Liebling!
Ich wünsche dir viel Freude mit dem neuen Block! Unten findest du noch einmal alle wichtigen Infos zu diesem Quilt Along, und dann geht’s los mit dem Tutorial – viel Spaß!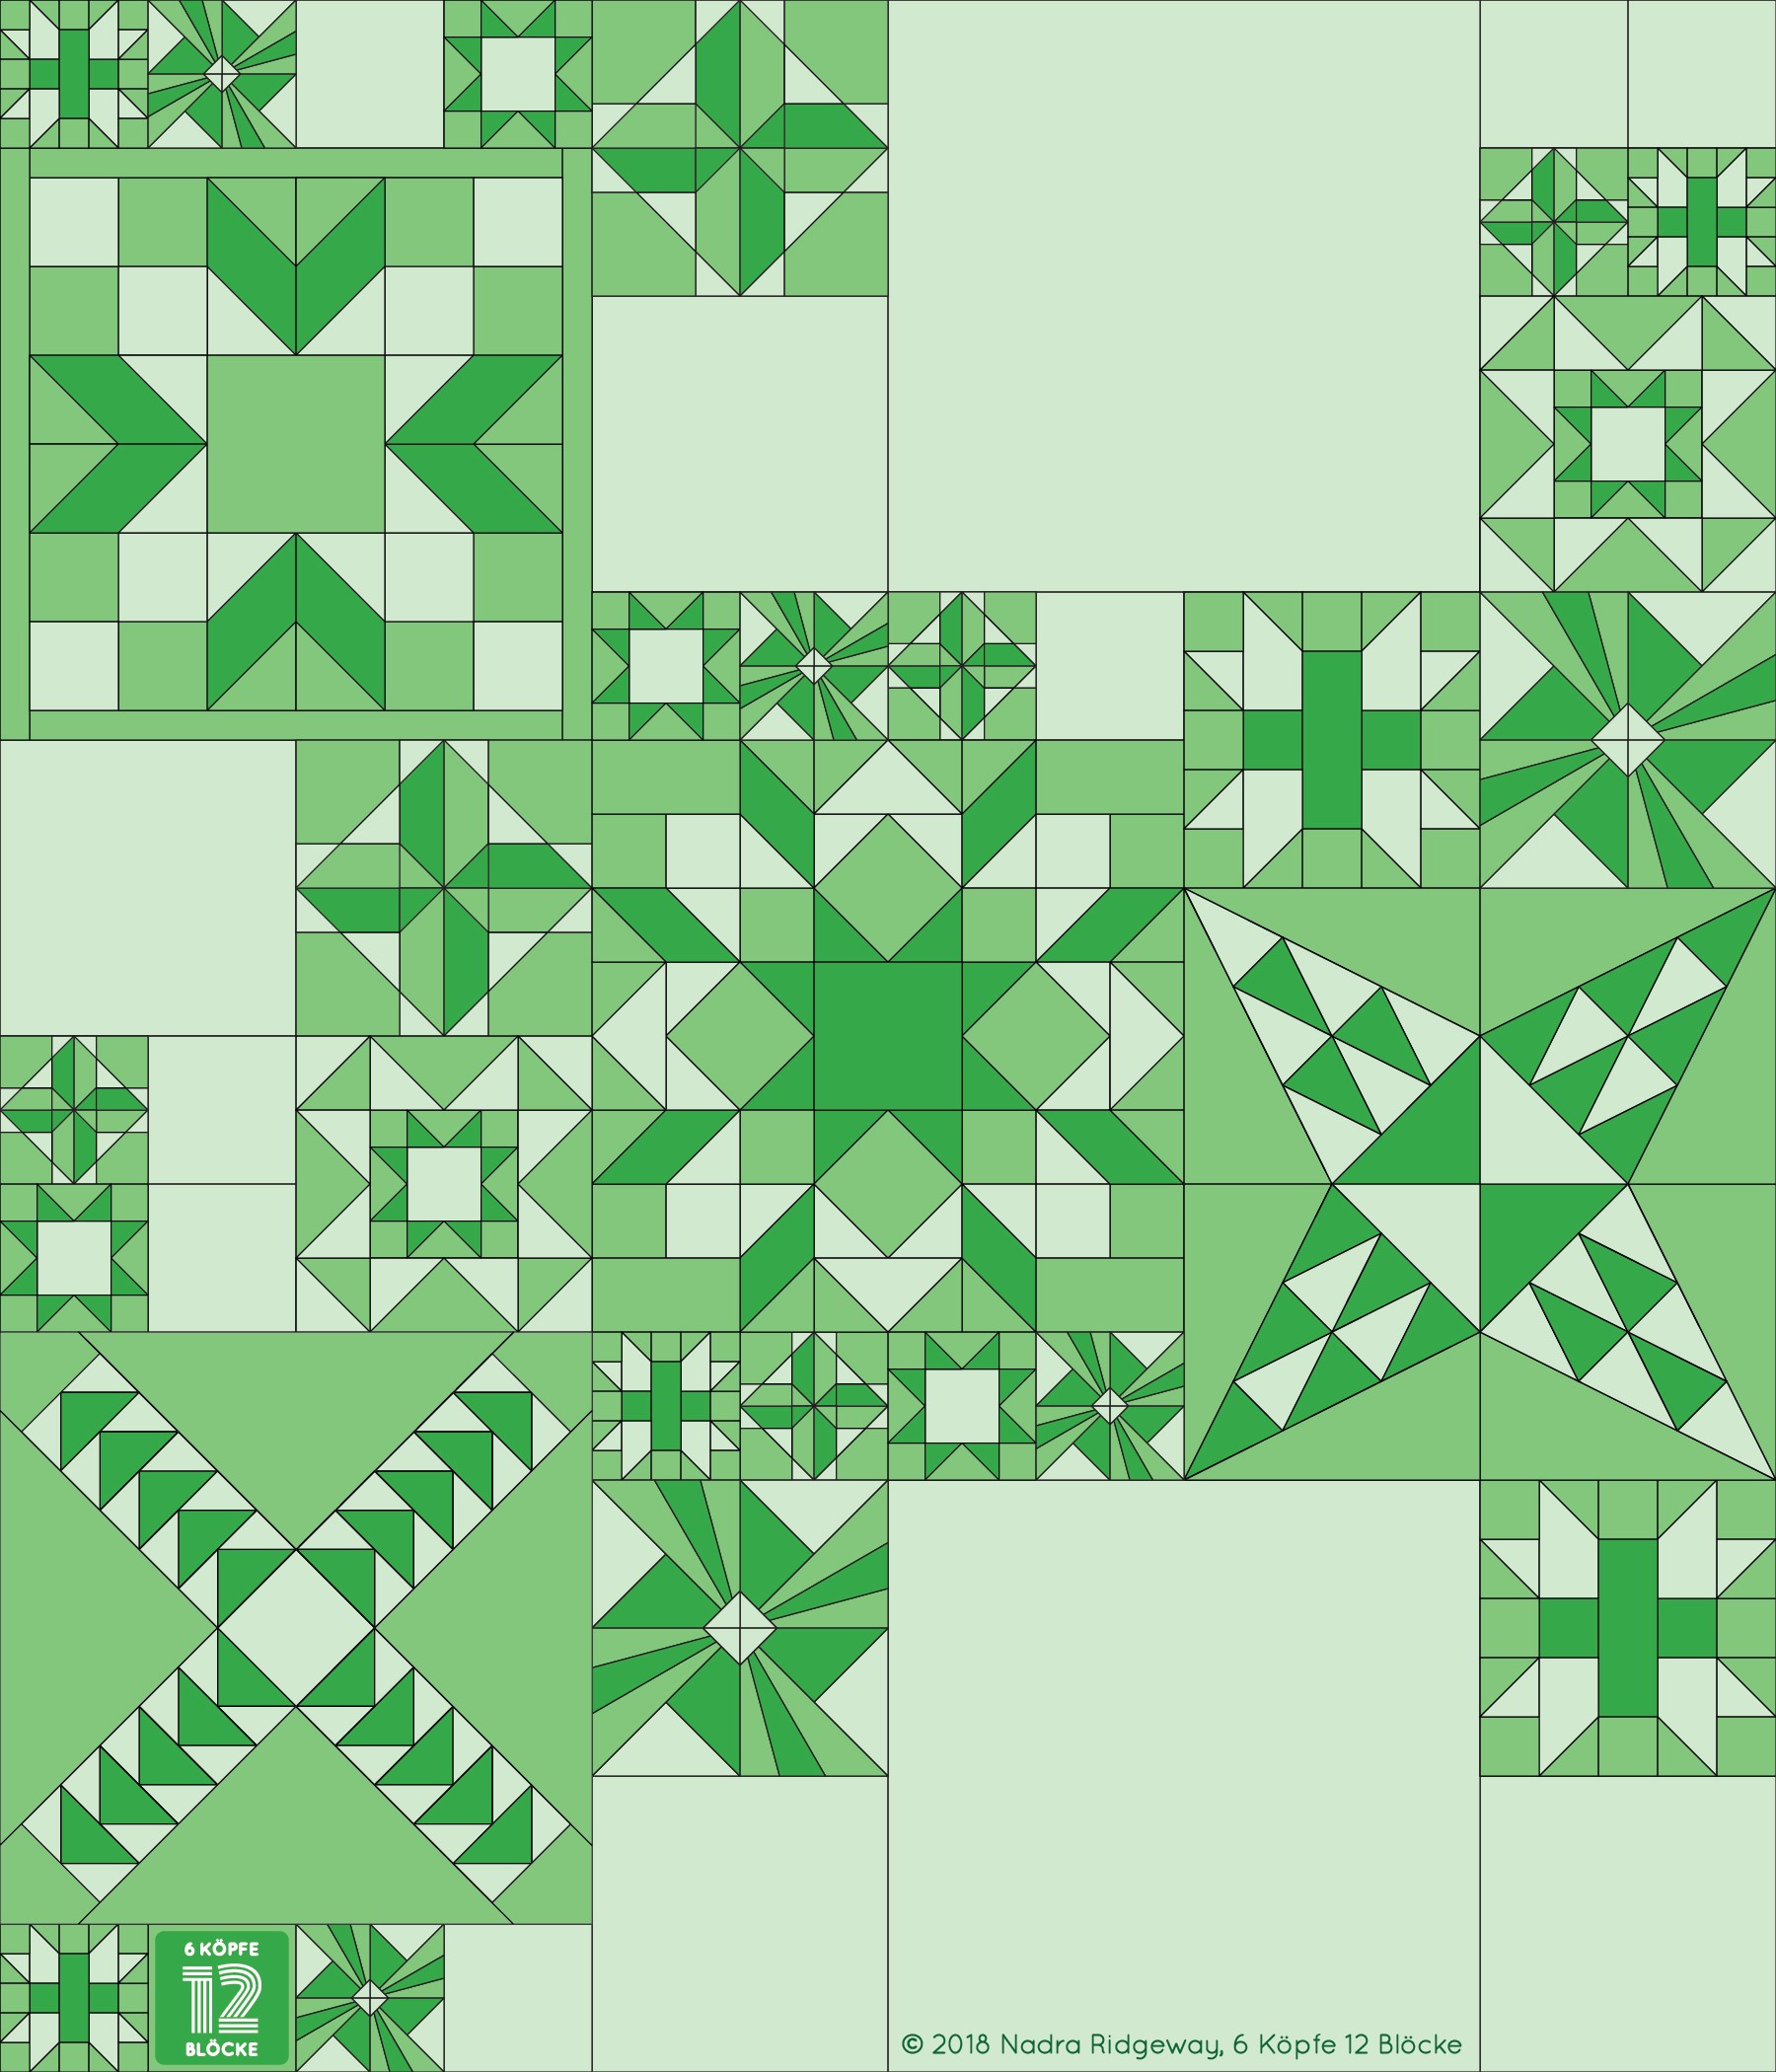
Hello and welcome to block number eight of the 6 Köpfe 12 Blöcke Quilt Along – the wonderful Wild Goose Chase quilt block! This month I will be showing you how to make this 20″ beauty! All good things come in threes, right? Nobody will ever question your Foundation Paper Piecing skills, after you’ve made this block! I will be totally honest with you – Foundation Paper Piecing is not my favorite piecing method. At least when it gets too complicated with lots of different parts and tiny fabric pieces. I love when it’s simple, and I don’t have to rack my brain over fabric placement. For this block we will be using mostly triangles which are easy to place and sew. I’m eager to hear what you think of this block…
The combination of pastels and low volume prints from all my lines, a pink solid for the background (Kona Cotton Medium Pink) and my go-to solid creme fabric is a dream come true – I’m a total sucker for candy colored quilts from the 30s and this piece will be an all time favorite!
I hope you’ll enjoy my tutorial. If you’re new here, you’ll find more infos about this quilt along below. And now, let’s get started!

6 Köpfe 12 Blöcke – Quilt Along
Du bist neu hier und hast noch nie von den 6 Köpfen gehört? Dieser Quilt Along ist ein Gemeinschaftsprojekt meiner „quilting peeps“ (die du oben auf dem Bild siehst) und mir. Letztes Jahr haben wir einen Row-by-Row Quilt genäht, im Jahr davor einen Quilt mit 12 klassischen Blöcken. Dieses Jahr werden wir unsere Fertigkeiten mit einem Skill Builder Mystery Quilt vertiefen. Wenn du bei diesem Jahresprojekt mitnähen möchtest, dann mach dich am besten vorher auf diesen beiden Seiten schlau:
→ 6 Köpfe 12 Blöcke – ALLGEMEINE INFORMATIONEN und LINKS ZU DEN TUTORIALS
→ 6 Köpfe 12 Blöcke – EINFÜHRUNG und ALLE INFORMATIONEN ZUM QUILT
Are you new here and haven’t heart of the ‚6 Köpfe‘ before? This quilt along is a joint project by me and my quilting peeps (on the image above). Last year we made a row by row quilt and the year before that a quilt with 12 traditional quilt blocks. This year we will move things forward with a skill builder mystery quilt. If you’d like to join us, you can read all about the quilt along here:
→ 6 Köpfe 12 Blöcke – GENERAL INFOS and TUTORIAL LINKS
→ 6 Köpfe 12 Blöcke – INTRODUCTION and INFOS ABOUT THE QUILT


Wild Goose Chase Quilt Block Tutorial
Bitte lies dir das Tutorial in Ruhe einmal komplett durch, bevor du beginnst.
Please read all instructions thoroughly before you begin.
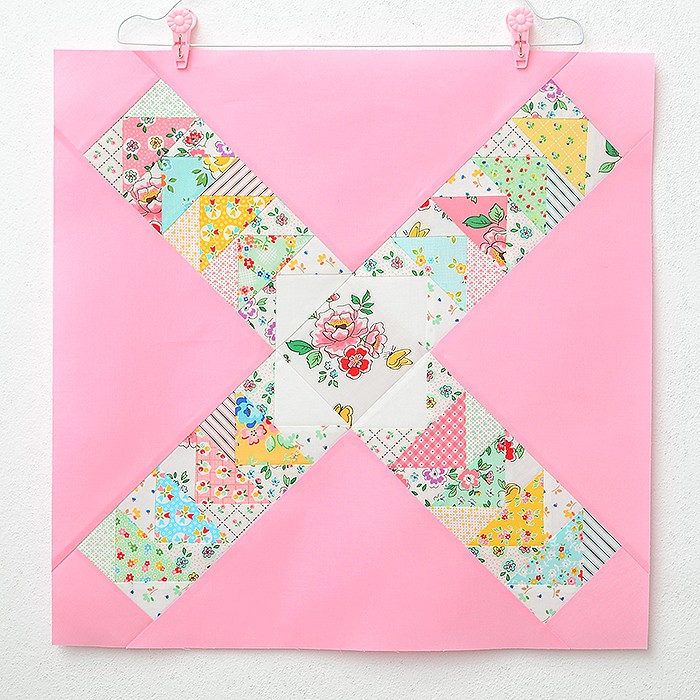
Block Größe: unvernäht 20 ½″, vernäht 20″ Die Nahtzugabe (in den Schnittteilen enthalten!) beträgt ¼″. Gebügelt wird in Richtung der angezeigten Pfeile. Um deinen Block zu planen, kannst du dir hier das Ausmalblatt ausdrucken:
Quilt block size: 20 ½″ unfinished , 20″ finished. The ¼″ seam allowance is included in all pattern pieces. Press the seams as shown by arrows. Print out the coloring page to plan your block:
→ AUSMALBLATT / COLORING PAGE
Materialien / Materials
Vorlage hier herunterladen / Download the template here:
→ Wild Goose Chase VORLAGE / TEMPLATE
Stoffe:
- Farbe 1: ca. 1 Fat Quarter
- Farbe 2: ca. 1 Fat Quarter / oder je 5″ x 10″ pro Farbe
- Hintergrundstoff: ca. ½ Yard
Die Angaben sind großzügig bemessen und erlauben eventuellen Verschnitt.
Fabrics:
- Color 1: approx. 1 Fat Quarter
- Color 2: approx. 1 Fat Quarter / or 5″ x 10″ per color
- Background fabric: approx. ½ yard
I have calculated the amount for the blocks rather generously to allow for cutting errors.
Zuschnitt / Cutting
Dieser Tabelle kannst du die Zuschnitt-Maße und Stofflabels des Wild Goose Chase Quilt Blocks entnehmen. Auf der linke Seite siehst du den Block, wie er in der Gesamtübersicht des Quilts oben dargestellt ist, auf der rechten Seite meine persönliche Stoffauswahl (zum Vergrößern anklicken).
Here are the cutting instructions and labels for the Wild Goose Chase Quilt Block as displayed in the original quilt diagram above (on the left, click to enlarge) and the fabric selection for my quilt (on the right).
Vorbereitung / Preparation:
Die C Quadrate einmal diagonal teilen und die B, D und E Quadrate zweimal diagonal teilen.
Cut the C squares on the diagonal once and the B, D and E squares on the diagonal twice.
Anleitung / Instructions:
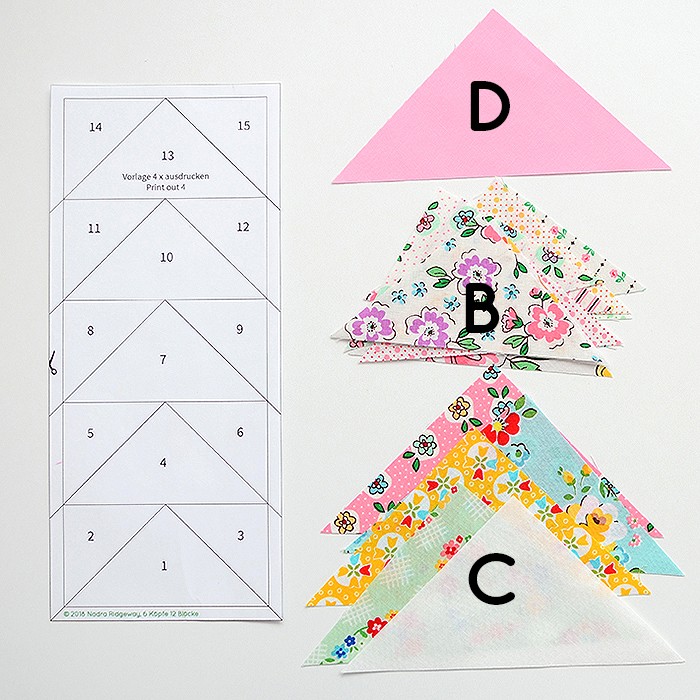
Die Vorlage insgesamt 4 mal ausdrucken und entlang der äußeren Linie ausschneiden. Für eine Wild Goose Chase Quilt Block-Einheit brauchst du (10) B Dreiecke, (5) C Dreiecke und (1) D Dreieck.
Print out the template 4 times and cut out along the outer line. You’ll need (10) B triangles, (5) C triangles und (1) D triangles for one Wild Goose Chase quilt block unit.
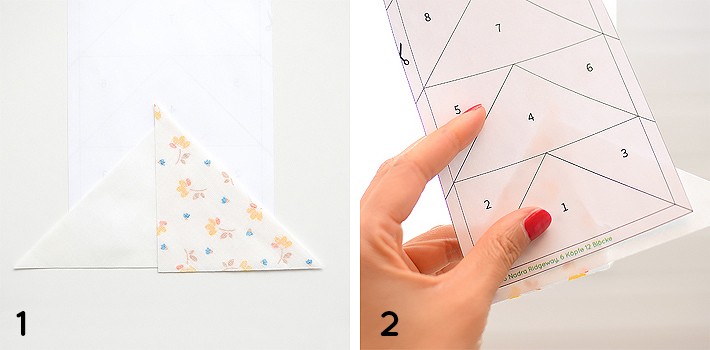
1-2) Ein C Dreieck und ein B Dreieck wie oben dargestellt rechts auf rechts auf die Rückseite der Vorlage legen. Die Ränder sollten nicht zu knapp an der äußeren Kante der Vorlage und der erste Nahtlinie überstehen. Für eine bessere Sicht können die Schnittteile gegen eine Lichtquelle (Lampe, Fenster) gehalten werden.
1-2) With right sides together, layer a C triangle and a B triangle on the back of the paper template as shown above. The raw edges should overlap the lines/outer edges fairly evenly. Hold paper and fabric up to a light source (lamp, window) to make sure they have the right position.
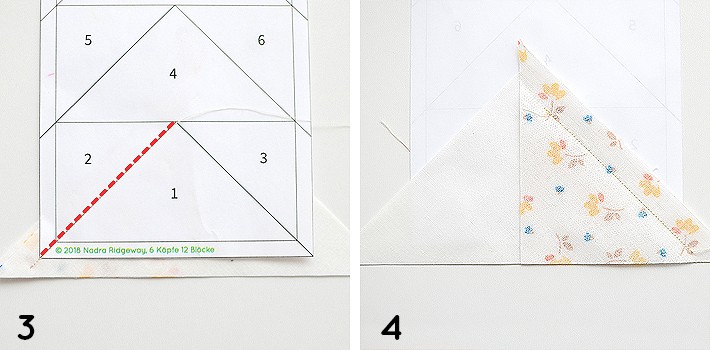
3-4) Wenn nötig, mit einer Stecknadel fixieren und auf der ersten Nahtlinie entlang nähen (dargestellt in rot). Ich habe die Stichlänge auf 1.3 gestellt, das ist zwar sehr eng, erleichtert aber das Heraustrennen des Papiers am Ende enorm.
3-4) Pin in place and stitch along the first line (indicated in red). I set the stitch length to 1.3 which makes it super easy to rip off the paper later.
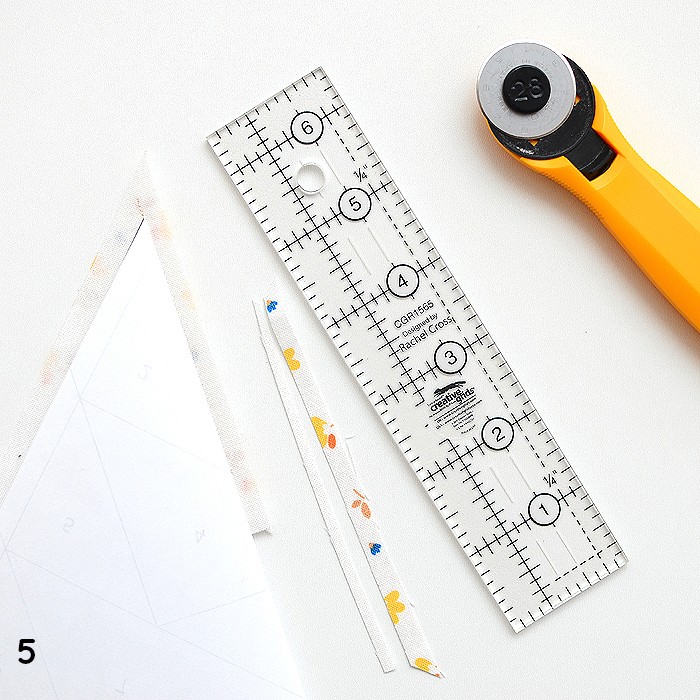
5) Anschließend das Schnittteil an der Naht umfalten und die Nahtzugabe bei ¼″ abschneiden.
5) Fold the paper on the line and trim the seam allowance to ¼″.
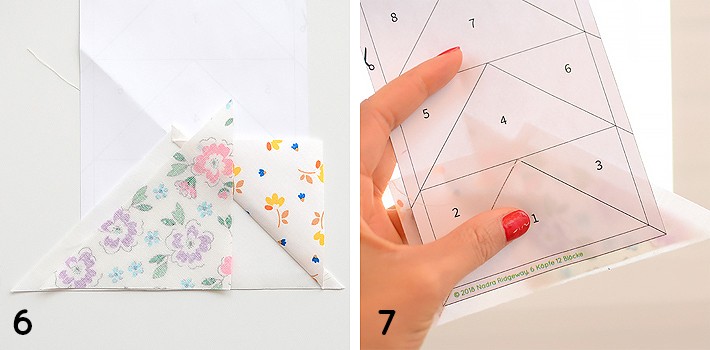
6-7) Das erste B Dreieck entweder mit den Fingern oder dem Bügeleisen nach außen pressen. Anschließend das zweite B Dreieck wie oben dargestellt, rechts auf rechts platzieren und wieder anhand einer Lichtquelle kontrollieren, ob das Stück alle Kanten/Linien überragt.
6-7) Use your finger or iron to press the first B triangle outwards. Next place the second B triangle on the C triangle with right sides together and use a light source to make sure it has the right position.
8-9) Wenn nötig, mit einer Stecknadel fixieren, auf der zweiten Nahtlinie entlang nähen (dargestellt in rot) und die Nahtzugabe wie in Schritt 5 bei ¼″ abschneiden.
8-9) Pin in place, stitch along the second line (indicated in red), fold the paper on the line and trim the seam allowance to ¼″.
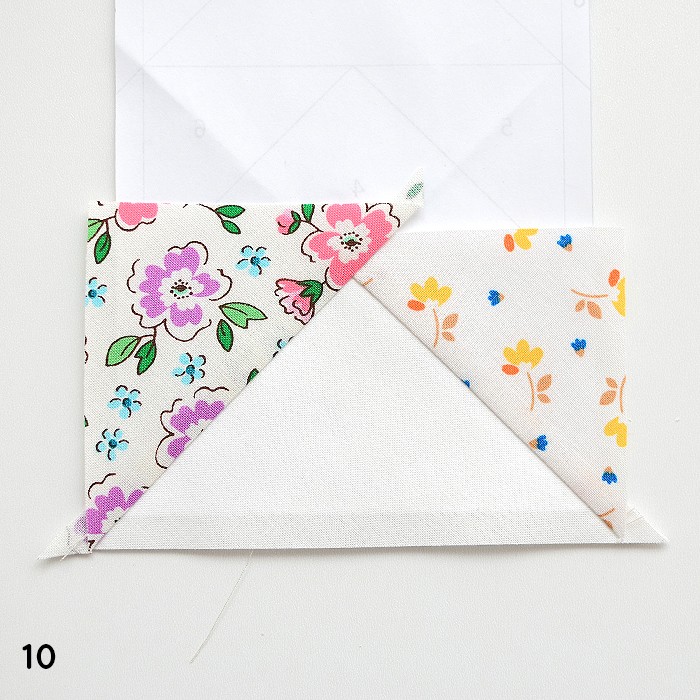
10) Das zweite B Dreieck entweder mit den Fingern oder dem Bügeleisen nach außen pressen. So sollte euer Einheit jetzt aussehen.
10) Use your finger or iron to press the second B triangle outwards. This is how your unit should look.
11-12) Das zweite C Dreieck wie oben dargestellt rechts azf rechts platzieren und wieder anhand einer Lichtquelle kontrollieren, ob das Stück alle Kanten/Linien überragt.
11-12) Place the second C triangle on your unit with rights sides together and use a light source to make sure it has the right position.

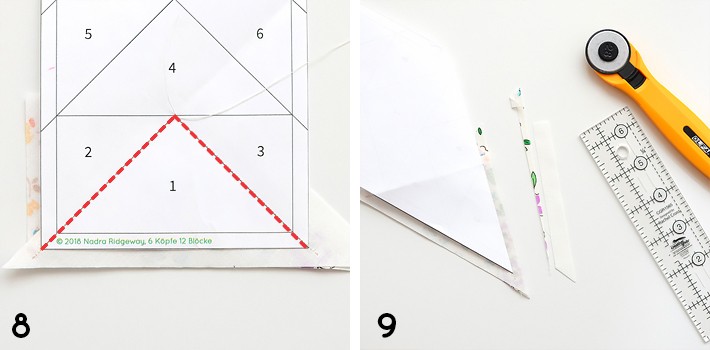
13-14) Wenn nötig, mit einer Stecknadel fixieren, auf der dritten Nahtlinie entlang nähen (dargestellt in rot) und die Nahtzugabe bei ¼″ abschneiden.
13-14) Pin in place, stitch along the third line (indicated in red), fold the paper on the line and trim the seam allowance to ¼″.
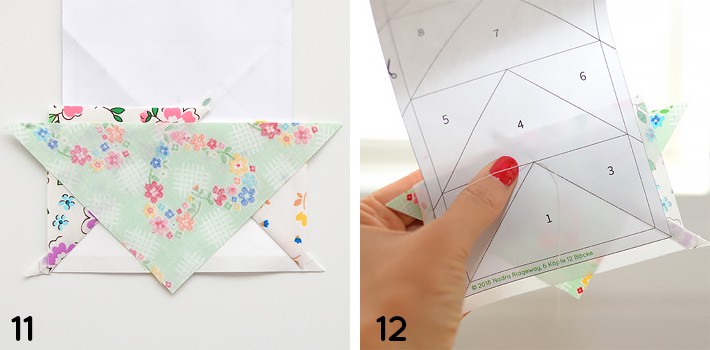
15) So verfährst du mit allen weiteren B und C Dreiecken, bis deine Papiervorlage vollständig vernäht ist.
15) Attach the remaining B and C triangle to your template until it’s completely covered.
16-17) Die Einheit noch einmal schön bügeln und anschließend den überstehenden Stoff an der äußeren Kante der Papiervorlage abschneiden.
16- 17) Press the unit firmly and trim off the overhanging fabric.
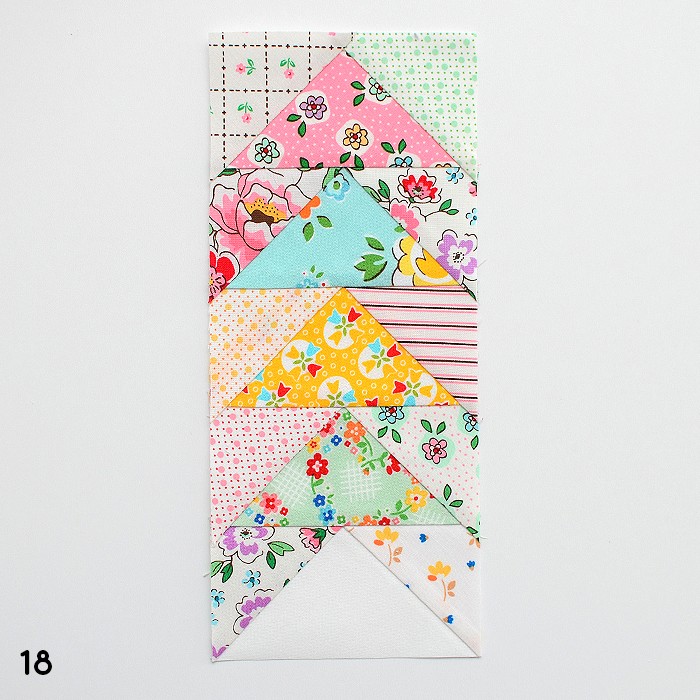
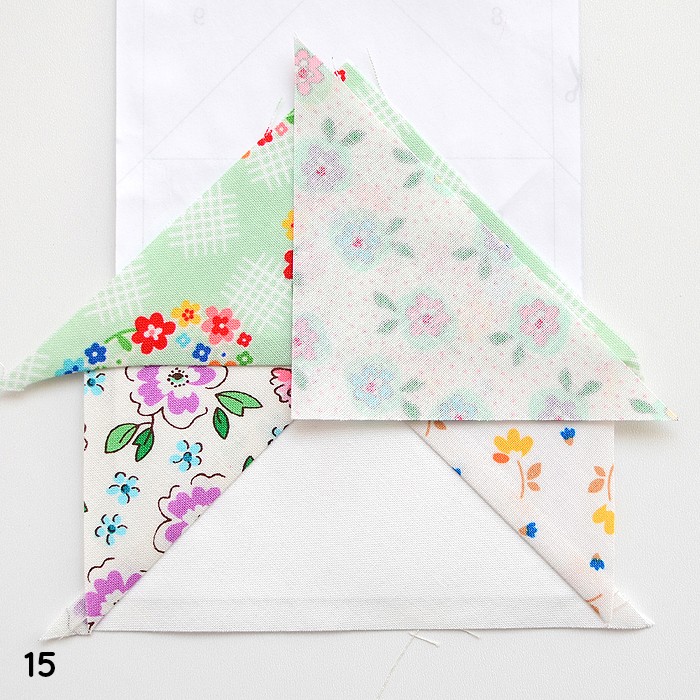
18) So sollte deine Einheit jetzt aussehen.
18) This is how your unit should look.
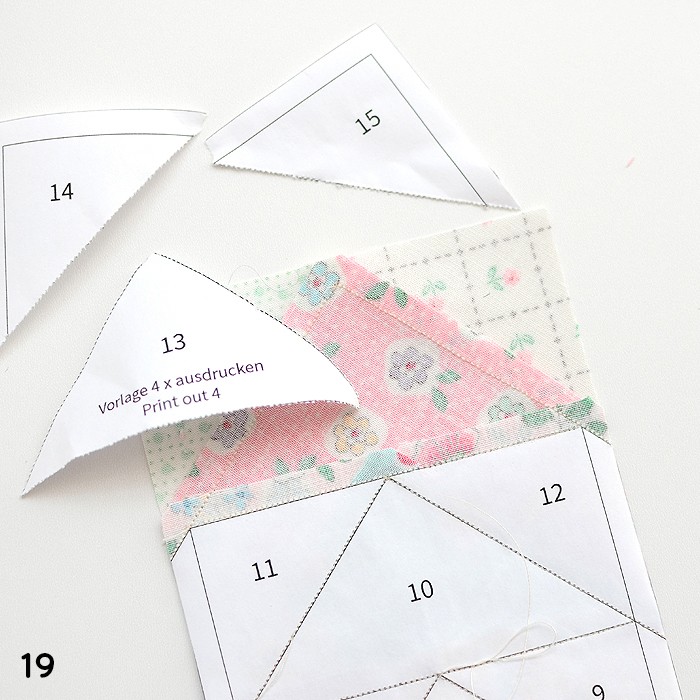
19) Vorsichtig die Papiervorlage entfernen.
19) Carefully remove the paper template.
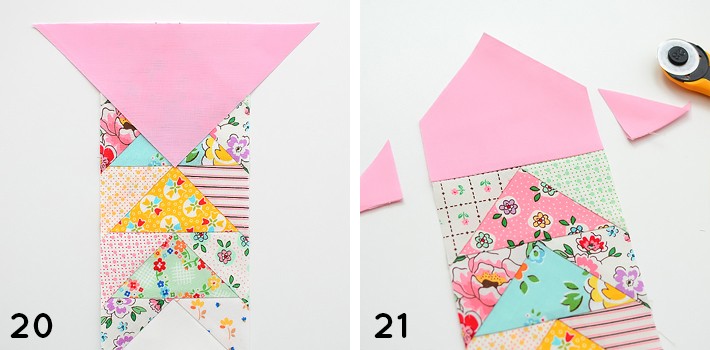
20-21) Anschließend das D Dreieck wie oben dargestellt rechts auf rechts und mittig am oberen Ende der Einheit platzieren, mit einer Nahtzugabe von ¼″ annähen und die überhängenden Ecken abschneiden.
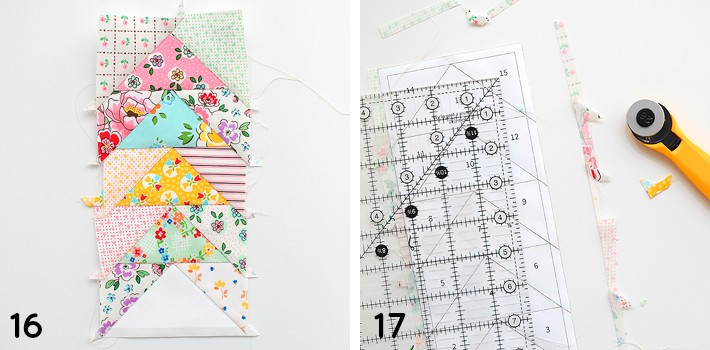
Schritte 1-21 wiederholen und insgesamt 4 Wild Goose Chase Quilt Block Einheiten herstellen.
20-21) Place the D triangle on the top end of the unit with right sides together, stitch in place using a ¼″ seam allowance and trim off the overhanging corners.
Repeat step 1-21 and make a total of 4 Wild Goose Chase quilt block units.
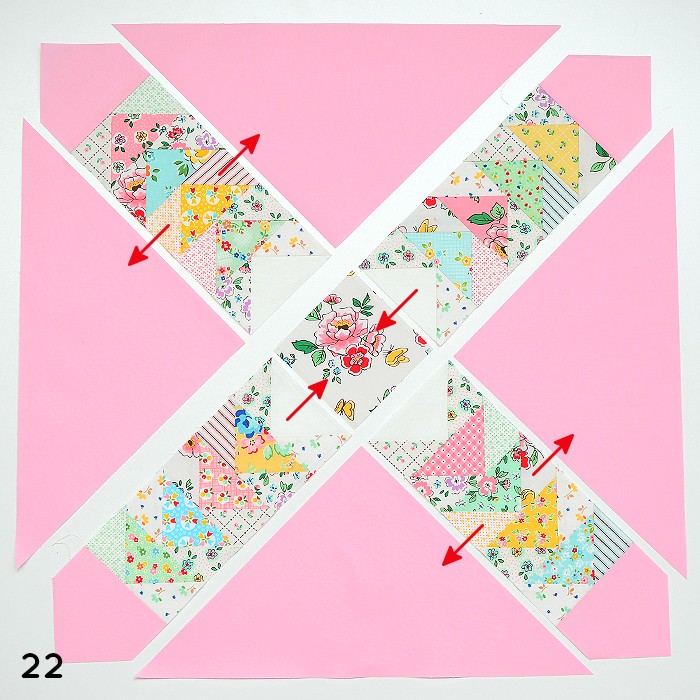
22) Die Block-Einheiten, die vier E Dreiecke und das A Quadrat wie oben dargestellt platzieren. Jeweils zwei E Dreiecke und eine Blockeinheit, und zwei Blockeinheiten mit dem A Quadrat zu einer Reihe verbinden.
22) Lay out your block units, the E squares and the A square as shown above. Assemble each one block unit and two E triangles and two block units and the A square into three rows.
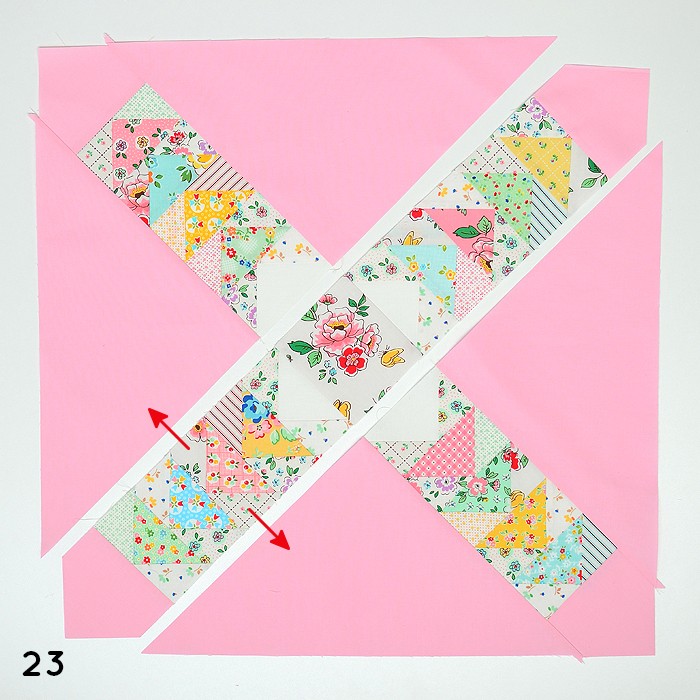
23) Als nächstes die drei entstandenen Einheiten wie dargestellt aneinander nähen. Der Block sollte ca. 21 ½“ im Quadrat messen. Anschließend den Bock auf eine Größe von 20 ½“ x 20 ½“ zurechtschneiden – und fertig!
23) Assemble the three rows as shown above. Your quilt block should measure approx. 21 ½“ square. Trim you block to 20 ½“ x 20 ½“ – and you’re done!
Ich hoffe es hat dir Spaß gemacht den Wild Goose Chase Quilt Block zu nähen und ich freu mich schon deinen Block in unserer Facebook-Gruppe zu sehen! Das ist der perfekte Ort um mit uns und den anderen Teilnehmern im Austausch zu sein, und deine Werke zu teilen! Über meinen Newsletter bleibst du immer auf dem neuesten Stand über alles, was hier passiert – als Abonnent kommst du außerdem in den Genuss von Specials wie Rabatt-Codes für meinen Etsy Shop in dem ich Patchwork-Anleitungen verkaufe! Anmelden kannst du dich im Anmeldeformular unten.
I hope you’ve enjoyed my tutorial and I can’t wait to see your blocks! Sign up to my newsletter in order to receive the English instructions for some of the blocks right to your inbox. As a subscriber you’ll also enjoy freebies and coupon codes for my Etsy shop! Am 1. September geht’s weiter bei Verena, die dir den neunten Block des Quilts zeigen wird – bis dahin wünsche ich dir eine schöne Zeit!
On September 1st, Verena will show you block no. 9 – until then, have a wonderful time! xoxo Nadra